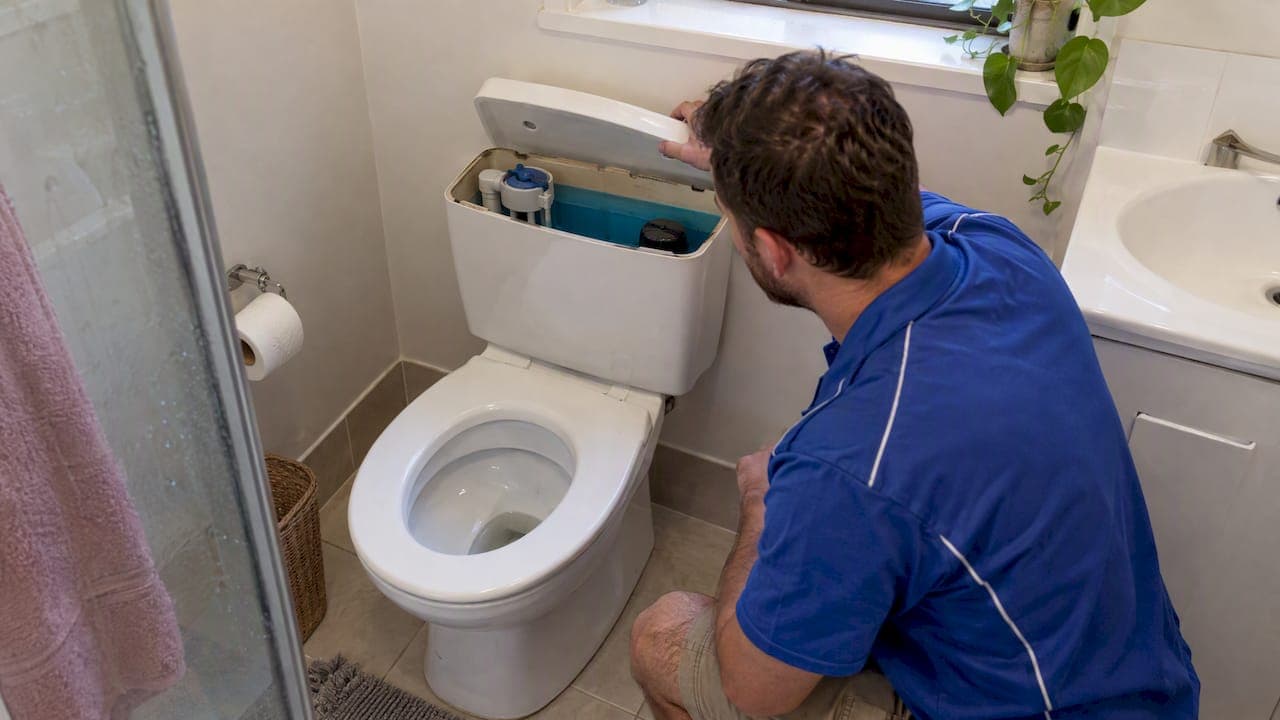
A toilet that keeps running almost always comes down to a leaking flapper or flush valve, or a faulty fill valve and float, and the fastest way to tell which is a simple food dye test in the cistern. Do that test before buying any parts. If the water keeps trickling after you have tried the matching fix, or a valve has seized, it is time to call a plumber.
TL;DR:
- If dye reaches the bowl within 10 to 30 minutes, clean or replace the flapper; if not, inspect the float and fill valve.
- Set the water level about 25 millimetres below the overflow tube, and rerun the dye test for a full 30 minutes after repairs.
- Call a licensed plumber if the isolation valve is seized, water pools at the base, or a replacement flapper fails again, suggesting seat damage.
- Check for leaks every 3 to 6 months; replace rubber flappers and seals proactively before they reach 7 to 10 years in service.
- An unchecked running toilet can waste 60,000 to 96,000 litres of water yearly, so routine checks can catch leaks before bills rise.
Table of Contents
- How to diagnose which cistern part is leaking
- Step-by-step DIY fixes for the common causes
- What parts, time and cost to expect
- When DIY stops and a plumber starts
- A simple maintenance routine to stop it happening again
- Our take on diagnosing and fixing a running toilet
- How older toilets compare to newer models
- Water pressure, supply quality and your toilet's fill valve
- What actually matters when fixing a running toilet
- Book a plumber for same-day or scheduled toilet repairs
- FAQ
- Sources
How to diagnose which cistern part is leaking
Before you touch anything, listen and look. A hissing sound, a constant faint trickle, or water staining down the back of the bowl all point to a leak somewhere between the cistern and the bowl.
- Lift the cistern lid carefully and set it somewhere stable, it is heavy and chips easily.
- Add several drops of food dye to the water in the cistern, not the bowl.
- Wait 10 to 30 minutes without flushing.
- Check the bowl: if coloured water has appeared, the flush valve or flapper is leaking.
If there is no colour in the bowl, but you still hear water running or refilling on its own, the problem usually sits with the fill valve or float rather than the flapper.
- Dye appears in the bowl: the flapper or flush valve seal is worn and needs cleaning or replacing.
- No dye in the bowl but water keeps refilling: the float is set too high or the fill valve is faulty.
- Water sits above the overflow tube: the float needs adjusting down immediately to stop overflow waste.
- Handle feels loose or chain looks tangled: check the chain and handle link before assuming a part has failed.
Take your time lifting the lid, and keep a towel handy, cisterns often hold more water than expected around the rim.
Step-by-step DIY fixes for the common causes
Before starting, gather a few basics: rubber gloves, an old towel, a torch, and a replacement flapper or fill valve if your diagnosis points that way. If you plan to replace the fill valve, locate the isolation valve near the floor and turn it off first.
- Chain and handle: open the lid, check the chain linking the handle arm to the flapper. If it is too tight, the flapper never seals; if too loose, it will not lift fully. Adjust the clip to leave a small amount of slack, then flush to test.
- Flapper: turn off the isolation valve, flush to empty the cistern, and lift out the old flapper. Check for cracks, warping, or a slimy film. Fit a matching replacement sized to your toilet's flush valve opening, then turn the water back on and watch for a clean seal.
- Float: for a ballcock-style float, bend the arm slightly downward to lower the water level; for a cup-style float on a modern fill valve, pinch the adjustment clip and slide it down the shaft. The water level should sit about 25 millimetres below the top of the overflow tube.
- Fill valve: if adjusting the float does not stop the hiss or phantom refills, the fill valve itself is likely worn. Replacing it involves disconnecting the water supply line, unscrewing the old valve from the cistern base, and fitting the new one with a fresh washer. This is a reasonable DIY job for anyone comfortable with basic tools, but if the isolation valve is seized or corroded, that is a sign to call a plumber rather than force it.
Pro Tip: After any fix, run the dye test again and leave it a full 30 minutes, some leaks only reappear once the flapper reseats under normal water pressure.
What parts, time and cost to expect
Most running toilet repairs are quick, cheap jobs if you have diagnosed the right part. A flapper or chain fix rarely takes more than 15 to 20 minutes once the water is off; a fill valve swap can take closer to 45 minutes for a first attempt.
- Flapper: inexpensive, widely available at hardware stores, typically a 10 to 15 minute swap.
- Chain or handle linkage: usually free or near-free to adjust, a 5 minute job.
- Fill valve: a moderate DIY cost, around 30 to 45 minutes to replace including shutting off and restoring water.
- Washers and seals: cheap, worth replacing alongside a fill valve rather than reusing old ones.
Where a job involves seized isolation valves, internal cistern damage, or work that needs to meet AS/NZS 3500 compliance, a licensed plumber is the safer route, particularly if you want any warranty on the repair to hold.
When DIY stops and a plumber starts
Some symptoms are a clear sign to stop adjusting and start dialling. A seized isolation valve, a flapper that fails again within days of replacement, or water pooling around the base of the toilet all point to something beyond a simple part swap.
- Seized or corroded isolation valve: forcing it risks a burst pipe, leave this to a licensed plumber.
- Repeated failure after a fresh flapper or fill valve: the flush valve seat itself may be damaged.
- Water pooling at the base: this can mean a cracked tank or a failed wax ring, not a cistern part at all.
- Compliance or warranty concerns: work on fixed plumbing in Australia is expected to meet AS/NZS 3500, and a licensed tradesperson protects that standard.
When you call, have the dye test result ready, a photo of the cistern interior, and the toilet's make and model if it is visible on the porcelain or in your installation documents. It speeds up diagnosis and often the quote too.
A simple maintenance routine to stop it happening again
A running toilet rarely appears out of nowhere, it is usually a seal or valve that has been quietly wearing out for months. Running the dye test every three to six months catches the problem before it shows up on your water bill.
- Every 3 to 6 months: repeat the dye test and listen for hissing or phantom refills.
- Before 7 to 10 years: replace rubber flappers and seals proactively rather than waiting for failure.
- Keep the cistern lid accessible: avoid storing items on top that make quick checks harder.
- Clean sediment: grit around the flush valve seat is a common cause of a flapper that will not seal properly.
A continuously running toilet can waste between 60,000 and 96,000 litres of water a year, enough to turn a minor leak into a serious jump in your water bill if it goes unchecked. A related guide to detecting hidden toilet leaks covers signs beyond the cistern worth checking during the same routine, and general preventative plumbing maintenance habits extend the life of these seals further. A bathroom cleanliness checklist is also worth a look, since grime buildup around fittings shortens the life of rubber components.
Our take on diagnosing and fixing a running toilet
Our experience across plumbing call-outs in homes, aged care facilities and retirement villages points to one pattern: most running toilets get mislabelled as "the toilet is old" when the real fault is a ten-dollar flapper or a float that needs a two-minute adjustment. Homeowners often replace the wrong part first, guessing rather than testing, which wastes money and leaves the leak running for longer.
The dye test is underused, it takes thirty minutes and tells you exactly which part is at fault, yet most people skip straight to buying a new fill valve kit.
Our priority for any reader facing this: test first, fix the specific part the test points to, and treat a second failure of the same part as a signal the flush valve seat or tank itself needs a trained eye rather than another trip to the hardware store.
— Mike
How older toilets compare to newer models
Toilets installed more than 15 years ago often use flapper and fill valve designs that were never built for durability the way current components are. Rubber compounds in older flappers degrade faster, and ballcock-style fill valves tend to develop a persistent hiss well before a modern cup-style valve would.
Newer toilet suites, including dual-flush and water-efficient models, generally use fill valves and flush valve seats designed to seal more consistently and are easier to service because parts are standardised across brands. If your toilet is older and you are replacing the flapper or fill valve for the second or third time in a few years, that repeated failure is often a sign the cistern itself, not just the rubber parts, is reaching the end of its practical life.
Replacing an ageing toilet suite entirely can reduce both water waste and the frequency of repair call-outs, particularly in homes where the cistern has already had multiple fill valve replacements. It is a bigger upfront job than swapping a flapper, but for a toilet that keeps failing the same way, it is often the more reliable fix.

Water pressure, supply quality and your toilet's fill valve
Fill valves and float mechanisms are sensitive to the water pressure and quality coming into your home. Higher-than-normal mains pressure can cause a fill valve to hiss or chatter even when the part itself is in good condition, while sediment or grit in the supply can lodge in the valve seat and stop it sealing cleanly.
Homes on older supply infrastructure or in areas with variable mains pressure sometimes see fill valve issues recur even after a straightforward replacement. If you have replaced a fill valve correctly and the toilet still runs intermittently, it is worth considering whether incoming water pressure or sediment is the underlying cause rather than the valve itself. A pressure-limiting valve on the main supply line can help protect fill valves and other fittings from this kind of repeated wear.
What actually matters when fixing a running toilet
The guides that treat every running toilet the same way are missing the point. A flapper fix and a fill valve fix are different jobs with different tools and different signs, and skipping the dye test to guess at the cause is the single biggest reason people end up buying two or three parts before the toilet actually stops running.
The conventional advice to "just replace the flapper" ignores that a float sitting too high is at least as common a cause, and no dye test will ever point you toward that fault, only the behaviour of the water level will.

What we think matters most: test before you buy, match the fix to the test result, and treat a repeat failure of the same part as information, not bad luck. That third flapper that fails in six months is telling you the flush valve seat is worn, not that you bought a bad flapper.
Book a plumber for same-day or scheduled toilet repairs
When a dye test points to a problem beyond a simple part swap, or the fix has not held after a second attempt, we offer plumbing repairs, emergency call-outs and scheduled maintenance for exactly this kind of cistern fault.
- We provide repairs for flapper, fill valve and flush valve issues as part of plumbing call-outs.
- We offer emergency availability for toilets that are overflowing or won't stop running.
- We also provide electrical, heating and cooling services, and scheduled maintenance, so a single call can address more than one issue in the same visit.
Book a repair or ask about scheduled maintenance through our plumbing services page.
FAQ
How do you fix a toilet that keeps running?
Run the food dye test first to find out whether the flapper or the fill valve is at fault, then apply the matching fix: clean or replace the flapper, adjust the float, or replace the fill valve. Most running toilets are fixed with one of these three repairs.
How do I stop my toilet from running?
Start by checking the chain and handle link, then test the flapper seal with food dye in the cistern. If dye appears in the bowl within 30 minutes, the flapper needs cleaning or replacing; if not, adjust or replace the fill valve and float.
Why is water constantly trickling into my toilet bowl?
A constant trickle almost always means the flush valve or flapper is not sealing properly, letting cistern water leak past it into the bowl. The food dye test confirms this by showing coloured water in the bowl after 10 to 30 minutes.
What is the most common cause of a running toilet?
A worn flapper or flush valve seal is the most common cause, closely followed by a fill valve or float that is not set correctly. Both are simple, low-cost fixes once the dye test tells you which one applies.
Sources
- Toilets :: Riverina Water
- How to check for toilet leaks - Water Corporation
- AS 3500 plumbing and drainage standards overview — Intertek Inform